Pin Mockup: Integrating Realistic 3D Displays into Your Design Workflow
In the fast-paced world of digital design and branding, the gap between a flat concept and a tangible product can often feel insurmountable. Clients and stakeholders frequently struggle to visualize how a two-dimensional graphic will translate onto physical merchandise. This is where a Pin Mockup becomes an indispensable asset in your creative toolkit. It serves not merely as a decorative element, but as a critical bridge in the communication process, allowing designers to present their work with professional clarity and realism.
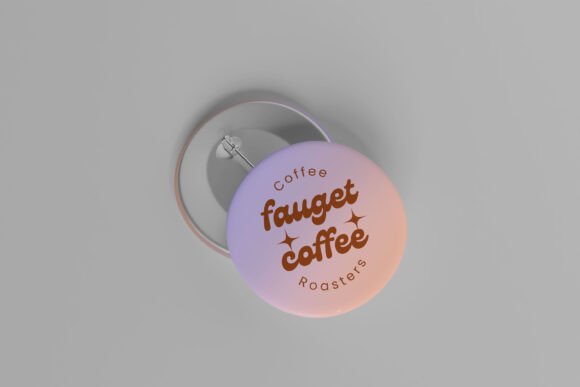
A high-quality pin mockup allows you to showcase designs in a realistic 3D display, providing depth, texture, and context that flat images simply cannot convey. By utilizing smart-object features within Photoshop, you can replace existing designs quickly and efficiently, streamlining the presentation phase of your project. This article explores how to integrate this resource into your broader workflow, ensuring that your final deliverables are not only visually stunning but also technically precise and ready for client approval or portfolio inclusion.
The Role of Visual Context in Client Presentations
When presenting a new logo, illustration, or brand identity, context is king. A design viewed in isolation on a white canvas lacks the environmental cues that help viewers understand scale, material, and application. A pin, being a small yet detailed accessory, requires a specific type of visual representation to highlight its intricacies. Using a Pin Mockup places your design in a relatable physical space, helping clients imagine the product in real-world scenarios.
This step is crucial during the mid-to-late stages of a creative project. Once the initial concepts have been approved and refined, the focus shifts to execution and merchandising. At this point, showing a client how their artwork looks on a lapel pin, badge, or enamel pin can significantly influence their decision-making process. It transforms abstract approval into concrete confidence. The realistic shadows, lighting, and perspective provided by a 300 DPI mockup ensure that the presentation feels premium and trustworthy.
Technical Specifications and Quality Control
To maintain professional standards, the technical quality of your assets matters immensely. The ideal pin mockup should be available in PSD Photoshop format, offering layers that are organized and easy to navigate. Key specifications to look for include a resolution of 300 DPI and dimensions around 3000x2000 pixels. These metrics ensure that your output remains crisp and clear, whether it is being viewed on a high-resolution monitor or printed in a physical portfolio.
Quality control extends beyond resolution. It involves checking how well the mockup handles different color profiles and contrasts. Since pins often feature metallic finishes, enamel fills, or intricate line work, the mockup must accurately reflect how light interacts with these surfaces. A well-constructed file will use smart objects to preserve the integrity of your original design while applying realistic distortions and lighting effects automatically. This reduces the manual effort required to adjust blending modes or opacity levels, allowing you to focus on the design itself rather than the technical setup.
Streamlining Production with Smart Objects
One of the most significant advantages of using a modern Pin Mockup is the efficiency gained through smart-object technology. In traditional workflows, placing a design onto a curved or textured surface might require complex warping tools, perspective grids, and manual shadow painting. This process is time-consuming and prone to inconsistency, especially when dealing with multiple variations.
With smart objects, the process is simplified to a few clicks. You open the designated smart object layer, paste your design, save, and close. The mockup automatically applies the necessary transformations, shadows, and highlights. This feature is particularly valuable for freelancers and agencies managing tight deadlines. It allows for rapid iteration, enabling you to test multiple colorways or design variations in seconds. This agility supports a more dynamic creative process, where feedback can be incorporated and visualized almost instantly.
- Speed: Replace designs within seconds, facilitating quick comparisons.
- Consistency: Ensure every variation maintains the same lighting and perspective.
- Non-Destructive Editing: Keep your original design files intact and editable.
- Ease of Use: Minimal learning curve, even for those with intermediate Photoshop skills.
Integrating Mockups into Broader Business Workflows
Beyond individual design tasks, a pin mockup fits seamlessly into larger business and marketing workflows. For entrepreneurs and small business owners, these assets are vital for e-commerce listings. Before committing to mass production, you can create compelling product images for your online store. This reduces the risk of investing in inventory that may not resonate with your audience, as you can gauge interest through high-quality digital previews.
Marketers and social media managers also benefit from these tools. Consistent, high-quality visuals are essential for building brand authority on platforms like Instagram, Pinterest, and LinkedIn. A realistic 3D display of a branded pin can serve as engaging content that highlights attention to detail and brand cohesion. Furthermore, educators and publishers can use these mockups to teach principles of product design, demonstrating how digital art translates to physical mediums.
When integrating this tool into your routine, consider organizing your asset library effectively. Store your mockup files in a dedicated folder, categorized by product type or project. Include the help file provided with the download to troubleshoot any potential issues quickly. Keeping your resources organized ensures that you can access them when needed, reducing downtime and maintaining momentum in your creative process.
Preparation and Best Practices for Optimal Results
To get the most out of your Pin Mockup, preparation is key. Start by ensuring your design file is properly formatted. Vector-based designs often yield the best results, as they can be scaled without loss of quality. If you are using raster images, ensure they are high-resolution to match the 300 DPI standard of the mockup. Clean up any unnecessary layers or elements in your design file before importing it into the smart object to keep the file size manageable and the workflow smooth.
Pay attention to the background and environment of the mockup. While the primary focus is the pin, the surrounding context can enhance or detract from the overall presentation. Choose a mockup that complements your brand’s aesthetic. For instance, a minimalist pin might look best on a clean, neutral background, while a vibrant, artistic pin could benefit from a more textured or colorful setting. Remember that photos used in previews are for illustration purposes only, so you may need to adjust lighting or colors slightly to match your specific brand guidelines.
Additionally, consider the long-term use of these assets. A versatile mockup can be reused across multiple projects, making it a cost-effective investment. By mastering the smart-object features, you build a reusable template that can adapt to various client needs. This consistency helps in establishing a recognizable visual style for your portfolio or brand, reinforcing professionalism and reliability.
Enhancing Collaboration and Feedback Loops
Effective design is rarely a solitary endeavor. It involves collaboration with clients, team members, and manufacturers. A realistic mockup serves as a common language in these discussions. Instead of describing how a pin will look, you can show it. This reduces misunderstandings and accelerates the feedback loop. When stakeholders can see a near-final representation, their comments become more specific and actionable, focusing on details rather than general impressions.
For manufacturers, providing a high-resolution mockup can also aid in the production process. While it does not replace technical vector files required for printing, it gives a clear visual reference for color matching and finish expectations. This alignment between design intent and production capability minimizes errors and ensures that the final physical product meets your quality standards.
In conclusion, incorporating a Pin Mockup into your design workflow is a strategic move that enhances presentation quality, improves efficiency, and facilitates better communication. By leveraging the power of smart objects and high-resolution displays, you can elevate your professional output and streamline the path from concept to completion. Whether you are a freelancer looking to impress clients or a business owner aiming to boost sales, this tool offers practical value that extends far beyond simple visualization. Embrace these resources to refine your process, ensure consistency, and deliver exceptional results in every project.