Elevate Your Brand with a Professional Coffee Cup Mockup
In the competitive world of graphic design and brand identity, presentation is everything. You might have spent hours perfecting a logo or a pattern, but if you present it on a flat, white background, it often fails to capture the imagination of your client or audience. This is where a high-quality Coffee Cup Mockup becomes an indispensable tool in your creative arsenal. It bridges the gap between a digital concept and a tangible product, allowing stakeholders to visualize how their branding will look in the real world. However, simply downloading any template from the internet is not enough. Many designers overlook critical technical details that can make or break the final presentation.
Understanding the nuances of these digital assets ensures that you are not just saving time, but also maintaining professional standards. A well-executed mockup does more than display an image; it tells a story about the lifestyle and quality associated with the brand. By focusing on realism, lighting, and ease of use, you can transform a simple design file into a powerful marketing asset.
The Trap of Low-Resolution Assets
One of the most common mistakes beginners and even seasoned freelancers make is ignoring the resolution specifications. It is tempting to grab the first free file you find, but using a low-resolution image for a professional pitch can be disastrous. When a client zooms in to inspect the details of your work, pixelation destroys credibility instantly. It suggests a lack of attention to detail and can lead clients to question the quality of your actual design work, not just the presentation.
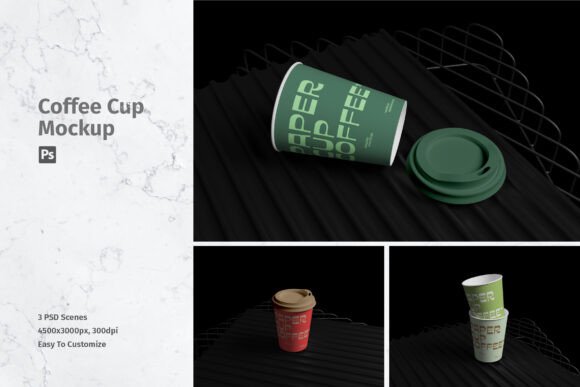
To avoid this, always verify the dimensions and DPI (dots per inch) before you begin working. The ideal standard for print-ready or high-end digital presentations is 300 DPI. For instance, a robust template should offer dimensions around 4500x3000 px. This size provides ample room for cropping and adjusting compositions without losing clarity. When you work with such high fidelity, the texture of the paper cup, the subtle shadows, and the reflections on the lid appear crisp and authentic. This level of detail helps viewers suspend their disbelief and engage with the design as if it were a physical object sitting on their desk.
Misunderstanding Smart Objects
Another frequent oversight involves the misuse of layer structures, specifically Smart Objects in Photoshop. Some designers attempt to paste their designs directly onto the visible layers, trying to warp and distort them manually to fit the curve of the cup. This approach is not only inefficient but also yields poor results. Manual warping rarely accounts for the complex lighting and perspective shifts inherent in 3D photography, leading to designs that look "stuck on" rather than printed on the surface.
The correct approach is to utilize the Smart Object features embedded in professional templates. These files are pre-configured to handle the heavy lifting of perspective and lighting integration. By double-clicking the Smart Object layer, you open a separate document where you can place your flat design. Once you save and close that window, Photoshop automatically maps your artwork onto the 3D model, applying the necessary curves, shadows, and highlights. This process takes seconds rather than hours. It ensures that your logo wraps naturally around the cylinder of the cup, maintaining proportional integrity and visual harmony. Always check if the template includes a help file or instructions if you are new to this workflow, as it can significantly speed up your learning curve.
Overlooking Lighting and Context
A static, poorly lit image can make even the best design fall flat. Many available mockups suffer from harsh shadows or unnatural color temperatures that clash with the brand colors you are trying to showcase. If the lighting in the mockup is too cool (blue-toned) and your brand uses warm earth tones, the final result may look disjointed and unappealing. This mismatch can confuse the viewer and dilute the emotional impact of your branding.
When selecting a Coffee Cup Mockup, pay close attention to the lighting environment depicted in the preview images. Look for soft, diffused lighting that mimics natural daylight, as this tends to be the most versatile and flattering for various color palettes. Additionally, consider the context. Is the cup placed on a rustic wooden table, a sleek marble counter, or a minimalist white surface? The background should complement the brand identity. A hipster coffee shop brand might benefit from a textured wood background, while a modern tech startup might prefer a clean, sterile environment. Choosing the right context helps communicate the brand’s personality without saying a word.
Ignoring File Organization and Versatility
Efficiency is key in professional design workflows. Downloading a disorganized file with hundreds of unnamed layers can waste valuable billable hours. Furthermore, relying on a single angle limits your ability to tell a complete visual story. Clients often want to see how the design looks from multiple perspectives—front, side, and perhaps a top-down view showing the lid.
A superior template package will include multiple PSD files, each offering a different angle or setting. For example, having access to three distinct PSD files allows you to create a cohesive presentation deck that shows the product in various lights. This versatility demonstrates thoroughness and gives the client a comprehensive view of the potential product. Before committing to a download, check the file structure. Are the layers logically grouped? Are the Smart Objects clearly labeled? A well-organized file reflects the professionalism of the creator and respects your time.
Clarifying Usage Rights and Inclusions
A critical area where misunderstandings occur is regarding what is actually included in the download. It is vital to remember that photos used in the preview images are often for illustration purposes only and are not included in the final file. Designers sometimes assume they are buying a complete scene with props, plants, and specific background elements, only to find they have purchased only the cup template. This can lead to frustration and additional costs if you need to source those extra elements separately.
Always read the description carefully. Understand that you are purchasing a tool to showcase your design. The value lies in the realistic rendering of the cup itself—the folds in the sleeve, the condensation on the plastic lid, and the steam rising from the rim. Ensure you have the necessary resources to create the surrounding environment if the template does not provide it. Alternatively, choose a template with a neutral background that allows your design to stand alone without requiring additional props.
Making the Right Choice for Your Project
Ultimately, selecting the right mockup is about balancing quality, usability, and aesthetic fit. Do not rush the selection process. Take the time to evaluate the technical specs, such as the 4500x3000 px resolution and 300 DPI quality, to ensure it meets your output needs. Verify that the Smart Object workflow is intuitive and that the file includes helpful documentation if needed.
By avoiding common pitfalls like low-resolution assets, manual warping, and mismatched lighting, you elevate your work from amateur to professional. A well-chosen Coffee Cup Mockup does more than display a logo; it validates your design decisions and helps clients visualize the success of their brand. Invest in high-quality tools, understand their features, and use them to create presentations that are not just visually appealing, but strategically effective. Your attention to these details will set you apart in a crowded marketplace, ensuring that your designs receive the recognition and approval they deserve.